Exporting and Restoring a PFX file to IIS
Export certificate and private key to PFX (Personal File Exchange) format
Certificate Snap-in
1. Open up the Microsoft Management Console (MMC).
Start -> Run -> Type “mmc” (without quotes) and Click OK or hit Enter on your keyboard.

2. Open Add/Remove Snap-in Window.
File -> Add/Remove Snap-in

3. Add the Certificates Snap-in.
Click Add then double-click Certificates


4. Select Computer Account and click Next.

Note: This step is very important. It must be the Computer Account and no other
account!
5. Select Local Computer and click Finish

6. Close the Add Standalone Snap-in window and click OK in the Add/Remove Snapin Window.
7. Click the + (plus) sign next to Personal and click on the Certificates folder

Export Process
1. Right-Click on the certificate that is to be exported and select All Tasks -> Export
2. When the Certificate Export Wizard starts, click Next on the Welcome Page.

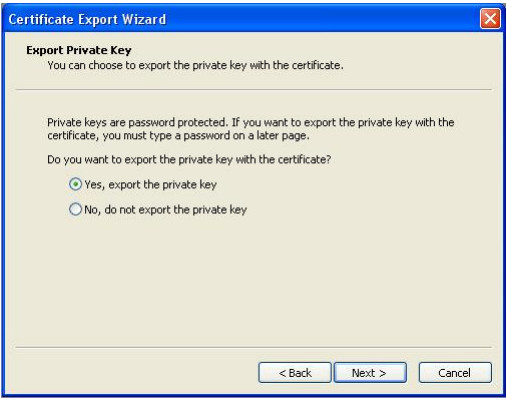
3. Select Yes, export the private key and then click Next

4. Leave the default settings that the window presents and click Next.

Note: These are the default settings, but put a check in the box labeled “Include all
certificates in the chain if possible” and leave the rest as is.
5. Type and confirm a password for the PFX file and then click Next.

Note: Instead of typing in a location you can Browse to a location to save it to by clicking the Browse button.
7. A confirmation page will be displayed upon completion of the previous step. Click Finish to complete the export process.

You will now have PFX file which is ready for transport. This file typically contains just your certificate and private key rolled into one file.
Note: If you selected Include all certificates in the certification path if possible, then your file will contain the full certificate chain with the private key and end entity/domain certificate.
Import Process
Note: The following steps require you to be inside the Certificate Snap-in part of the MMC, if you are not already there please follow the section above titled Certificate Snap-in.
1. Right-Click on folder labeled Certificates under the Personal folder and select All Tasks-> Import
Import Certificate Wizard appears

2. When the Certificate Import Wizard starts click Next
3. Browse or type in a location for the PFX file.

4. Type the password to the PFX file in the provided box and click Next.

Note: If you need to re-back up this key when imported, then make sure the box Mark this key as exportable… is checked-off.
5. Select Automatically select the certificate store based on the type of certificate and click Next.
6. On the Completing the Certificate Import Wizard page, click Finish

7. Close the MMC and in case you are prompted, it is not necessary to save the changes.
You have now successfully completed the Certificate Import wizard.
Placing newly imported certificate into IIS 5.x & 6.x
- Open the IIS Manager
- Right-click on the site that you would like to use the certificate and select Properties.
- Click on the Directory Security tab and click on the Server Certificate button.
- Follow the wizard.
- If there is already a certificate on the website select Replace and then click Next.
Note: If this site does not have a certificate on it already then click Assign… and then
click Next. - Finish the certificate wizard.
- Restart Website
Placing newly imported certificate into IIS 7.x
- Open IIS (Start -> Administrative Tools -> IISM -> Server Name)
- Open Web Sites by left-clicking the tiny triangle to the left of Web Sites.
- Single left-click on the Web Site name. Example: Default Web Site.
- Select Bindings from the Edit Site sub menu. (see image)

5. In the next window to come up, single left-click on the type https to select.
6. Click Edit.
7. Select the appropriate SSL certificate from the SSL certificate drop-down box.
8. Click OK to save changes.
9. Verify certificate is working on Web Site by visiting the site in your web browser.
Related Articles
Root and Intermediate Certificate installation via MMC
Certificate Installation: IIS 7.x
